A client recently sent me a panicked email: their WordPress website had been hacked and their home page was full of young, bare-chested men, each one linking to a porno site. Not a great start to the day.
Yes, Your Site is Vulnerable
Any site is vulnerable, no matter how obscure
This was a low-traffic site. I was surprised to see it hacked. But the truth is, these kinds of attacks aren’t made by humans directly. They’re automated, run by bots that scan websites and take advantage of known vulnerabilities—all while the actual human hackers sleep soundly. Yes, this can happen to you.
After a minute or two, I saw the site’s main <.htaccess> file had been compromised. It was full of commands to bypass WordPress altogether, overriding the site’s normal display and replace it with mano-a-mano love magic. So my first move was a quick fix. I replaced the contents of the compromised <.htaccess> file with the standard WordPress commands (see below). The client’s site came back up instantly.
WordPress Out of Date?
Older versions of WordPress have known weaknesses that hackers love to exploit. One of the easiest things you can do to keep your site secure is simply to make sure you’re always running the latest version of WordPress.
Unfortunately, my client’s WordPress install was several versions out of date; they hadn’t updated, or called me to update, the site. So that was an obvious and easy thing to fix, too.
Digging Deeper, Making WordPress Secure
But I knew I could probably do more, make the site really secure. I doubted my client’s server had been hacked directly via FTP (something an email exchange with the site’s host confirmed) so I figured it was an injection attack of some kind. I went Googling. Here’s what I learned…
What to do When Your WordPress Site is Hacked — But Preferably Before Your WordPress Site is Hacked
1) Quick WordPress Security Fixes
Fix <.htaccess>
First of all, if your <.htaccess> file is full of junk commands (and after making a back-up copy of the hacked file because you never know!) replace its contents with something like the following, the most common WordPress settings under Apache…
# BEGIN WordPress

<IfModule mod_rewrite.c>

RewriteEngine On

RewriteBase /

RewriteCond %{REQUEST_FILENAME} !-f

RewriteCond %{REQUEST_FILENAME} !-d

RewriteRule . /index.php [L]

</IfModule>

# END WordPress
These commands vary slightly from site to site so, for quick client-specific reference, I keep a copy of each site’s htaccess commands in my local client folders, in plain <htaccess.txt> text files.
Next, while you’re messing with the <.htaccess> file, you can add a layer of protection to the all-important <wp-config.php> file. Add the following lines to <.htaccess>…
<files wp-config.php>

order allow,deny

deny from all

</files>
This prevents any access to the <wp-config.php> file from beyond the server. Awesomeness in the house.
Back Up Everything
I do two layers of back-up.
First, I go to WordPress › Tools › Export and choose to export All Content. This sends a text dump of all users, posts and pages (and sometimes other content) to my desktop which I can re-import later should things go badly.
Second, I log in to the site’s control panel and get access to phpMyAdmin. From here, I export a backup of the complete SQL database behind the website which can also be re-imported later. (You can’t have too many backups.) If you don’t have direct access to phpMyAdmin, talk to your site’s hosting company for pointers.
N.B. There are WordPress plugins which automate the process of regular back-ups but it’s helpful to know how to make these quick back-ups “by hand”.
Update WordPress
Next, update your WordPress install to the latest version. It’s just a matter of one or two clicks whenever you see that yellow “new version” note on your dashboard. After you’ve backed-up, though, riiiiight?
Change Passwords
Do this for all your users, in case somebody has used a really dumb password. WordPress will email each user their new log-in details.
If you’re feeling sufficiently paranoid, do the same for your FTP account.
Remove Unused Themes
It doesn’t make sense to have extra files hanging around, especially files that can interact directly with your database and server. Remove any unused themes from WordPress, either from WordPress › Appearance › Themes, or simply with your FTP client.
Remove Unused Plugins
The same goes for any unused plugins. If you leave them in place, hackers can guess their default paths and try to access your server. Delete via WordPress › Plugins › Installed Plugins or your FTP client.
2) Change the Obvious
You can (and should) do all of the following every time you install a new instance of WordPress. These best practices give you an added layer of security by changing some of WordPress’ default values. You’ll thank yourself later.
First, Never Use “admin”
When you’re setting up a brand new site, WordPress suggests the very first user be named “admin”. Change this every single time to something else, anything else!, because hackers know to start with “admin” as the default user.
If you’re currently using “admin” as your main administrator account, do these things for yourself right now: add a new user cunningly named anything but “admin”, then assign the role “Administrator”, log out, log back in as the new cunningly-named user, then simply delete the stupid “admin” user (switching all that user’s content to the new account). Done.
Second, Change the WordPress Table Prefix
During installation, the <wp-config.php> file suggests you use wp_ as the master table prefix, but this can be anything you like. You should change this every single time to something else, anything else!, because otherwise hackers know exactly what all your WordPress tables are called and they will attempt direct SQL injection attacks. Nasty like Rhianna on crack.
N.B. If your site is already up and running with the wp_ table prefix, it’s a little trickier to change, but you can do it: the WordPress security plugin mentioned just below comes with a tool to automate the process of switching your table prefixes to something non-obvious.
3) Install a Security Plug-In
There are several great plugins but I like WP Security Scan as a first line of defense. It’s free and relatively easy to set-up—if you’re comfortable working via FTP and have some basic Apache nerd skills.

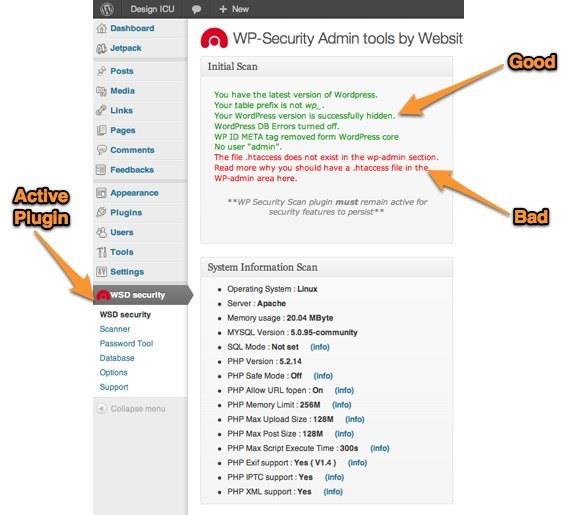
Once you install the plugin, you’ll see it listed at the bottom of the admin menu. The content area will show a list of helpful notes, green and red, corresponding to what’s good and bad about your current installation.
WSD Security Scan does several things to make your WordPress site invisible to common hacks…
- It removes a line of code from your site’s HTML which broadcasts the version of WordPress you’re using (so hackers don’t know what they’re attacking and, in fact, you may not even pop up during their spidering process);
- It turns off database error reporting so that hackers don’t have access to useful clues;
- It lets you know if the security suggestions I’ve listed above have been implemented.
It also helps you do two other very useful things which, for non-nerds, are more complicated to pull off. These are explained below—like, right-now-below…
4) Secure Your WordPress Directories with the Correct Permissions
If you visit the Scanner page of the WSD plugin, you’ll see a list of vulnerable files and directories. Items that have insecure permissions will be highlighted.
Use your FTP client to get info on each directory and file listed, then adjust the permissions until they match WSD’s suggestions.
N.B. One of these files is the <.htaccess> file and, once you tweak its permissions, WordPress will starting showing the error message “Please make sure your .htaccess file is writable”. Now, when setting up a WordPress site, having the <.htaccess> file writeable is a good thing. But once you’ve got the site settings worked out, it’s best to lock down <.htaccess> just as this plugin suggests; you can always loosen things up again later, on an as-needed basis.
5) Secure Your /wp-admin/ Directory
Getting this recommendation up-and-running is tricky but for business-critical, heavily-trafficked and e-commerce sites, it’s a powerful way to keep your WordPress site nice and secure.
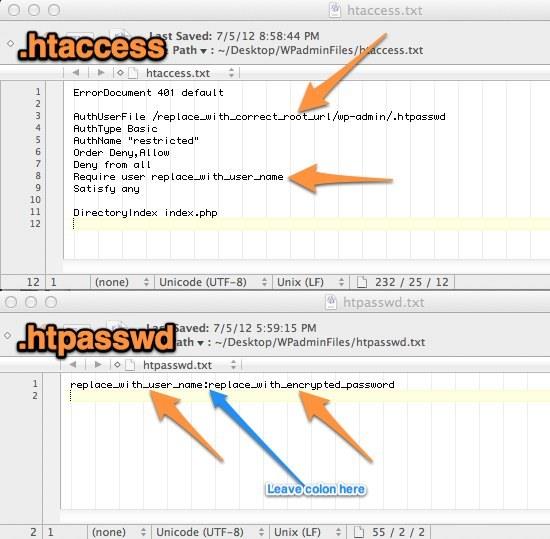
Let’s apply a standard Apache/server-level lock to your /wp-admin/ directory. Anyone trying to access that directory will then have to enter a separate UserID and Password before they see a single WordPress screen. That is, your WordPress back-end will now have two layers of UserID/Password protection.
The gist of it is that you place two small files in your /wp-admin/ directory:
- an <.htaccess> file which contains a set of commands to restrict access to specific users, and;
- an <.htpasswd> file which contains the list of users and their encrypted passwords.
I’ve included the necessary files in the archive below, which contains everything you’ll need.
After you upload these files to your /wp-admin/ directory, you’ll need to adjust the first two filenames. Remove “.txt” from the end and add a “.” to the start, so you end up with…
/wp-admin/.htaccess

/wp-admin/.htpasswd

/wp-admin/WhatsMyRoot.php
If there are any similarly-named files already in your /wp-admin/ directory, before overwriting, make sure to copy them to your computer for safe keeping.
The tricky thing is finding your root URL to put in the first file. For that, use the <WhatsMyRoot.php> page. Place it anywhere on your server, then access it using your browser to find your site’s root URL. Simply copy and paste the URL into the <.htaccess> file where indicated.
Next, make sure to remove the <WhatsMyRoot.php> file as soon as you’re done. Leaving it in place is a security risk.
Now look through the two remaining files in a plain text editor and edit both so that all occurrences of “replace_with_correct_root_url”, “replace_with_user_name” and “replace_with_encrypted_password” contain the correct information.

Users names go to the left of the colon in the <.htpasswd> file. Encrypted passwords go to the right.
Here are links to several password generators in case one of them is down, as one was for me, right when you need it…
- http://www.htaccesstools.com/htpasswd-generator/
- http://aspirine.org/htpasswd_en.html
- http://www.htpasswdgenerator.net/
- http://tools.dynamicdrive.com/password/
Now, when you visit your /wp-admin/ directory, the server will ask you to verify your identity before you can proceed to WordPress.
You don’t need to set up a separate UserID/Password for each user. To keep your maintenance simple, you can add a single user with a strong password, then share that user’s details with all your trusted site editors.
For mission-critical sites, however, you should supply a range of unique UserIDs and passwords, adding each one on a new line in the <.htpasswd> file. If you do this, you’ll need to tweak a single line in the <.htaccess> file. Change…
Require user replace_with_user_name
…to…
Require valid-user
…and now the server will grant access to any of the unique users listed in the <.htpasswd> file—so long, of course, as they have the right password.
6) Further Reading on WordPress Security: Go Deeper
If you’re feeling adventurous, there are more sophisticated things you can do. You can change the location of the /wp-admin/ directory. You can protect WordPress from malicious script injections. You can prevent hot-linking to the images on your site.
Read about these additional to-dos, and more, at the following pages…
- 28 Ways to Secure WordPress Website (HostingFacts.com)
- 10 Useful WordPress Security Tweaks (Smashing Magazine)
- More About Authentication Using Your <.htaccess> File (apache.org)
- Hardening WordPress (WordPress Codex)
- Backing Up Your Database (WordPress Codex)
- Change the Location of the /wp-admin/ Directory (confirmed-super-nerds only)


